Display and Indicator Round-up
A mostly simple list of basic information.
LCD displays, the most common interface, it's typically easiest to get one specified for your device, at least identify the driver chip the display uses and be sure there is driver code available.
Here's a guy's review of several ESP-32 boards that come with either LCD or OLED displays.
(You can pay twice the price to get one from Adafruit that is guaranteed to work with their drivers and tutorials.)


There are flexible panels available (for about twice the regular price) said to flex as much as 180 degrees, those surface mount components look like their ready to pop off the board, I would probably use 4 or more boards to wrap a cylindrical, and avoid exercising them unnecessarily.

LCD displays, the most common interface, it's typically easiest to get one specified for your device, at least identify the driver chip the display uses and be sure there is driver code available.
Here's a guy's review of several ESP-32 boards that come with either LCD or OLED displays.
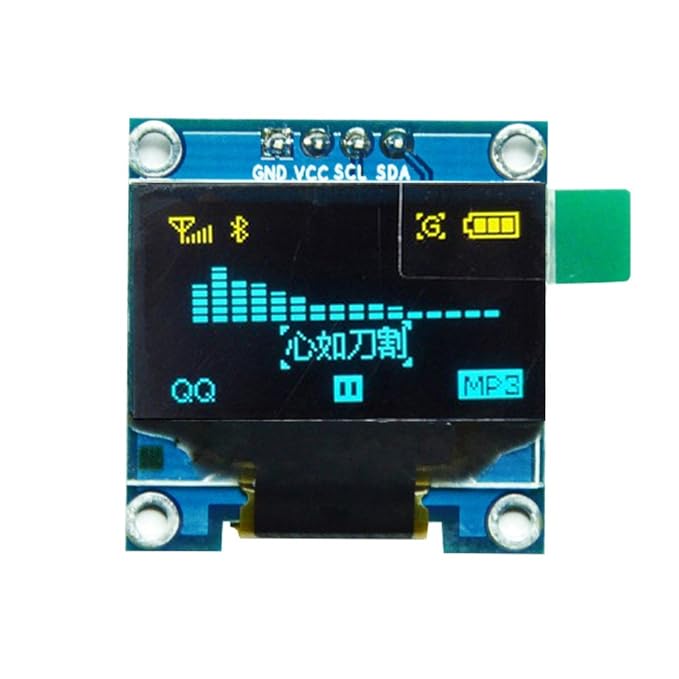
Organic LEDs available to hobbyists are typically low cost and low resolution, but have a sharp energy efficient image. The last 0.96" mono-color OLED I just ordered from Aliexpress was $2.15, with 128X64 resolution and a relatively slow I2C interface, a bit of status information can be a big help.
 |
| Novel model with 2 different pre-tinted Yellow and Blue zones. |
HUB-75 interface video wall LED modules
I was checking out a new 1" 8x8 Neopixel display using 2mm LEDs that sells for $25.
You can get a display panel with 2048 LEDs for about the same amount.


These displays are a lot more complicated to drive, unlike the newer Neopixel and Dotstar strips that have a serial driver built into each LED, your computer has to constantly scan the multiplexed displays, that can have 4/1 to 32/1 multiplexing to save component cost, each pixel may have to be touched by your driver 1000 times a second to get a good color range from PWM. Commercial installations require some powerful rack mount high speed circuitry that may also be doing video scan conversion and gamma correction, this is a good application for FPGA boards that can do simple repetitive tasks quickly. Driving with a typical 8 bit Arduino board may reduce effective color resolution to more like 12 bits (4096 colors).
 |
| Typical HUB-75 connector |
Here's the typical HUB-75 connector these panels generally use, single bit row data is clocked in through the R, G, B pins ABCXXX pins scan the matrix rows, larger displays have more address pins where the grounds appear above.
One trick to get a large brightness range with lower overhead is Binary PWM, instead of having 256 possible pulse widths, is uses uses 8 predefined pulse widths with weights of through 128, this irregular pattern results in a bit more flicker than conventional PWM.
In one scenario , a brightness value of 165 would drive the LED in the 1us, 4us, 32us and 128us slots.
Panels commonly come in 16x32 to 64x64 (4096) LED arrays, they also come in different pixel spacing from 2mm to 10mm with lower density used for outdoor billboards viewed at a distance.
It's important to buy all the panels you need (and a spare) in the same batch, for best matching of LED characteristics. Specs include: pixel spacing, brightness, frame rate, refresh rate.

There are flexible panels available (for about twice the regular price) said to flex as much as 180 degrees, those surface mount components look like their ready to pop off the board, I would probably use 4 or more boards to wrap a cylindrical, and avoid exercising them unnecessarily.

Portable rental video walls typically use die cast housing about 50x50cm , pre-wired with panels that quickly snap together in the field.
Here's one Video Wall Supplier catalog
Raspberry Pis with their high clock speeds are prospects for driving multiple boards, some take their chances directly driving the TTL level boards with the 3/3v Pi GPIO signals, this is risking color smear or worse.
I just ran across a source of a $4 (with shipping) board with level shifters driving 3 HUB-75 sockets, allowing 3 strings of panels to be driving, with minimal tedious cable soldering. I will be testing this with a $5 Pi Zero and a $3 SD card, for a total electronics cost of about $12.


Comments
Post a Comment